
The secret to a stress-free first international trip isn’t a perfect itinerary; it’s building robust logistical and psychological safety nets that empower you to handle the unexpected with confidence.
- Shift focus from avoiding problems to creating systems (like an arrival protocol and a flexible budget) that make you resilient.
- Prioritize destinations with a strong “Infrastructure of Safety” (connectivity, transport, emergency access) over just popular tourist spots.
Recommendation: Adopt a “Hybrid Scaffolding” approach: pre-book critical elements like your first night’s stay and airport transfer, but leave the rest of your itinerary flexible for genuine exploration.
The dream of a first overseas adventure—exploring ancient streets, tasting new foods, discovering a different culture—is powerful. Yet, for many, this excitement is quickly overshadowed by a rising tide of anxiety. You start to think about language barriers, getting lost, safety, and managing money in a foreign currency. Suddenly, the dream feels more like a logistical nightmare. The common advice to “just make a list” or “be aware of your surroundings” often falls short because it doesn’t address the root cause of the panic: a feeling of losing control.
This guide takes a different approach. We won’t give you another generic packing list. Instead, we’ll act as your travel coach, helping you build a series of practical, reassuring systems. Think of it as constructing a scaffold around your trip. You’ll learn to create a framework that manages the biggest sources of stress, from choosing a destination with a solid “Infrastructure of Safety” to implementing a “Golden Hour Protocol” for your first 60 minutes on the ground. The goal isn’t to eliminate every possible problem—that’s impossible. The goal is to give you the tools and the confidence to know you can handle whatever comes your way.
By focusing on building these psychological and logistical safety nets, you transform anxiety into empowerment. You’ll move from a state of “what if?” to “I’m ready for this.” Let’s dismantle the overwhelm, piece by piece, and build the foundation for an incredible, life-changing journey.
This article is structured to guide you step-by-step through this process. You’ll find actionable strategies in each section, designed to build your confidence as you plan. Explore the topics below to start building your anxiety-free travel plan.
Summary: How to Plan Your First Overseas Trip Without Getting Overwhelmed?
- Why Do 60% of First-Time Travelers Feel Panic Before Departure?
- How to Choose a Safe Destination for Your First Solo Trip?
- Agency Package or DIY: Which is Safer for a First-Time Traveler?
- The Overpacking Mistake That Ruins Mobility for New Travelers
- How to Survive the First 24 Hours in a Country Where You Don’t Speak the Language?
- Daily Cap or Total Budget: Which Psychological Method Works Best?
- The $50,000 Bill: What Does a Medical Evacuation Actually Cost?
- How to Create a Custom Itinerary That actually Works in Practice?
Why Do 60% of First-Time Travelers Feel Panic Before Departure?
That feeling of near-panic as your departure date looms is not a sign of weakness; it’s a predictable biological response. For a first-time international traveler, you are stepping into a world of unknowns, and your brain is wired to treat “unknown” as “unsafe.” This anxiety isn’t vague; it’s highly specific. In fact, research reveals that pre-departure anxiety peaks around three hours before the flight, precisely when you’re navigating airport security and facing the finality of your departure. This is when abstract fears about language, safety, and logistics become intensely real.
The core of this panic isn’t the travel itself, but the fear of being unable to cope with a problem far from home. Your mind races with “what-if” scenarios: What if I can’t read the signs? What if I get sick? What if my card doesn’t work? These aren’t just thoughts; they are perceived threats that trigger a fight-or-flight response. The solution, therefore, isn’t to pretend these problems don’t exist. It’s to systematically dismantle the feeling of helplessness by building a plan that addresses these fears head-on.
The encouraging news comes from research on this very topic. In a decade-long study, Dr. Sarah Chen found that 85% of first-time solo travelers who reported severe pre-trip anxiety later described their journey as the most empowering experience of their lives. The initial fear is not an endpoint; it’s a starting point. By confronting and planning for these anxieties, you are not just preparing for a trip—you are setting the stage for personal transformation. The journey from fear to confidence begins with understanding that your anxiety is both normal and conquerable.
How to Choose a Safe Destination for Your First Solo Trip?
For a first-time traveler, “safety” means more than just a low crime rate. It means having access to a reliable support system, even when you’re alone. The most reassuring factor you can control is choosing a destination with a strong “Infrastructure of Safety.” This refers to the underlying systems that make a place easy and secure to navigate, dramatically reducing the friction and anxiety of being in a new environment. This is especially crucial for solo female travelers, for whom this framework provides an essential layer of security.
This infrastructure isn’t just about police presence; it’s about modern connectivity and convenience. For example, a key component is reliable mobile data. Studies show that solo travelers using local SIM cards are 23% less likely to encounter navigation-related safety issues, as they can access maps, translation apps, and emergency services instantly. Instead of vaguely researching “safe neighborhoods,” focus on verifying these five concrete pillars of a modern safety infrastructure.
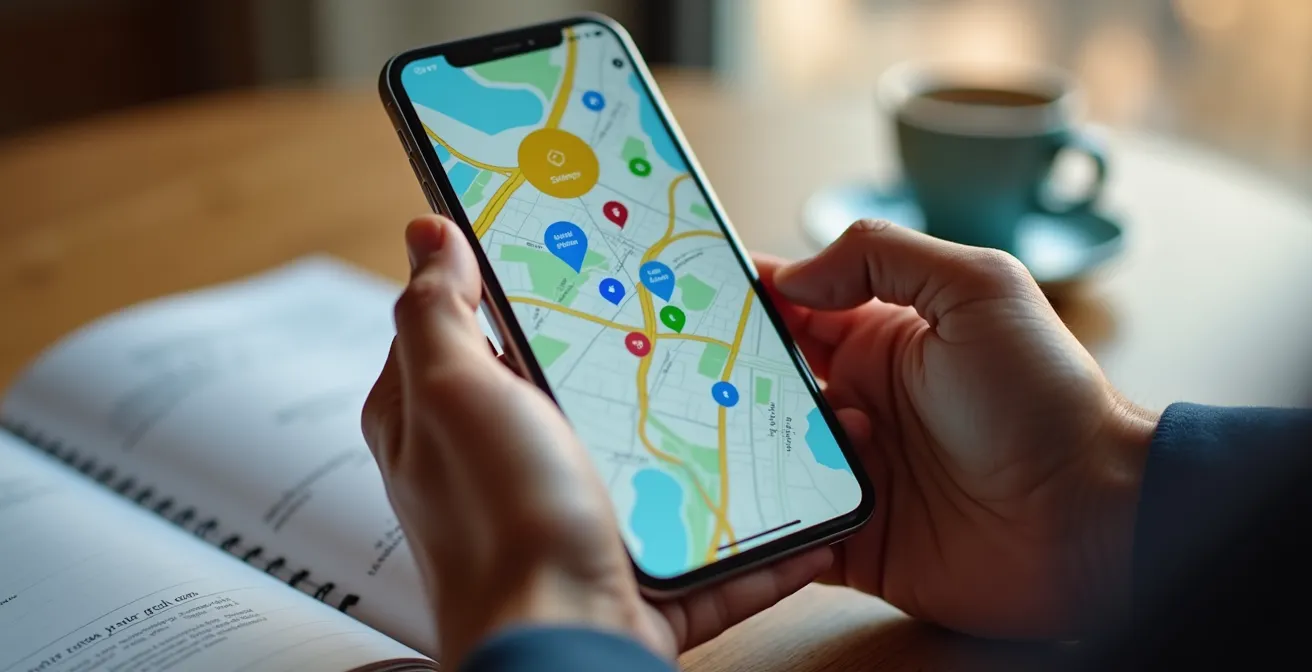
As the image suggests, the right tools can turn an intimidating, unknown city into a manageable map of safe points and resources. Your phone becomes your most powerful safety tool when supported by a robust local infrastructure. Before you book a flight, use the following checklist to audit a potential destination’s “Infrastructure of Safety.”
Your Action Plan: The Infrastructure of Safety Checklist
- Connectivity: Check for widespread eSIM support (e.g., Airalo coverage) or the availability of official SIM card vendors inside the airport terminal upon arrival.
- Transportation: Verify the presence and reliability of rideshare apps with safety features (like Uber, Lyft, or Grab) as a backup to public transport.
- Communication: Ensure you can download offline maps and language packs for your destination via apps like Google Maps and Google Translate before you depart.
- Emergency Access: Research the exact address and contact number of your country’s nearest embassy or consulate. Save these details offline in your phone.
- Payment Infrastructure: Identify the prevalence of contactless payments and locate ATMs situated inside secure locations like major banks or hotels, avoiding standalone street machines.
Agency Package or DIY: Which is Safer for a First-Time Traveler?
One of the biggest decisions for a first-time traveler is whether to book a fully guided tour or plan everything yourself. The tour offers a safety net but sacrifices freedom, while DIY travel offers freedom but can feel like a tightrope walk without a net. However, there is a third, more powerful option: the “Hybrid Scaffolding” approach. This method provides structure and safety where it matters most—the critical moments of arrival and departure—while leaving you free to explore independently in between.
This approach involves pre-booking only the highest-stress components of your trip. For example, you might book your first two nights in a well-reviewed hotel, arrange a vetted airport transfer service to meet you upon landing, and perhaps schedule a half-day walking tour on your first morning to get oriented. This “scaffold” eliminates the immediate panic of finding your way while jet-lagged and in a new country. Once you’re settled and confident, you’re free to be spontaneous.
This hybrid model offers a powerful balance of security and autonomy, making it the ideal choice for most anxious first-timers. The US Department of State’s free Smart Traveler Enrollment Program (STEP) is a perfect example of this principle in action. By enrolling, DIY travelers gain access to official safety alerts and embassy assistance in a crisis, a government-backed safety net that doesn’t compromise their independence. It’s a form of scaffolding that has proven critical in emergencies worldwide.
The following table breaks down the psychological and practical differences between these three approaches, highlighting why the hybrid model often provides the best of both worlds.
| Safety Factor | Full Agency Package | Complete DIY | Hybrid Scaffolding |
|---|---|---|---|
| Emergency Support | 24/7 tour operator assistance | Self-reliant, embassy only | Critical moments covered |
| Airport Transfers | Pre-arranged, vetted drivers | Self-arranged on arrival | First/last night secured |
| Local Knowledge | Professional guides throughout | Research-dependent | One guided orientation day |
| Cost Premium | 30-50% above DIY | Baseline cost | 10-15% above DIY |
| Flexibility | Limited, fixed itinerary | Complete freedom | Structured start, free exploration |
The Overpacking Mistake That Ruins Mobility for New Travelers
Overpacking is the most common rookie mistake, and it stems directly from anxiety. You’re not just packing clothes; you’re packing for every imaginable “what-if” scenario. The result is a heavy, cumbersome bag that restricts your mobility, incurs extra fees, and becomes a constant source of stress. The solution isn’t a magical packing list, but a system that forces discipline and efficiency: the packing cube method. This isn’t just about organization; it’s a psychological tool that shifts your mindset from “packing for possibilities” to “packing with purpose.”
By assigning categories to different cubes (e.g., one for tops, one for bottoms, one for underwear), you create physical limits. When a cube is full, you’re done with that category. This prevents the “I’ll just add one more shirt” spiral. It forces you to choose versatile pieces that can be mixed and matched, rather than packing single-use outfits. Furthermore, color-coding the cubes creates a visual filing system within your suitcase, allowing you to find what you need without tearing everything apart. This small sense of order can be incredibly calming in an unfamiliar hotel room.
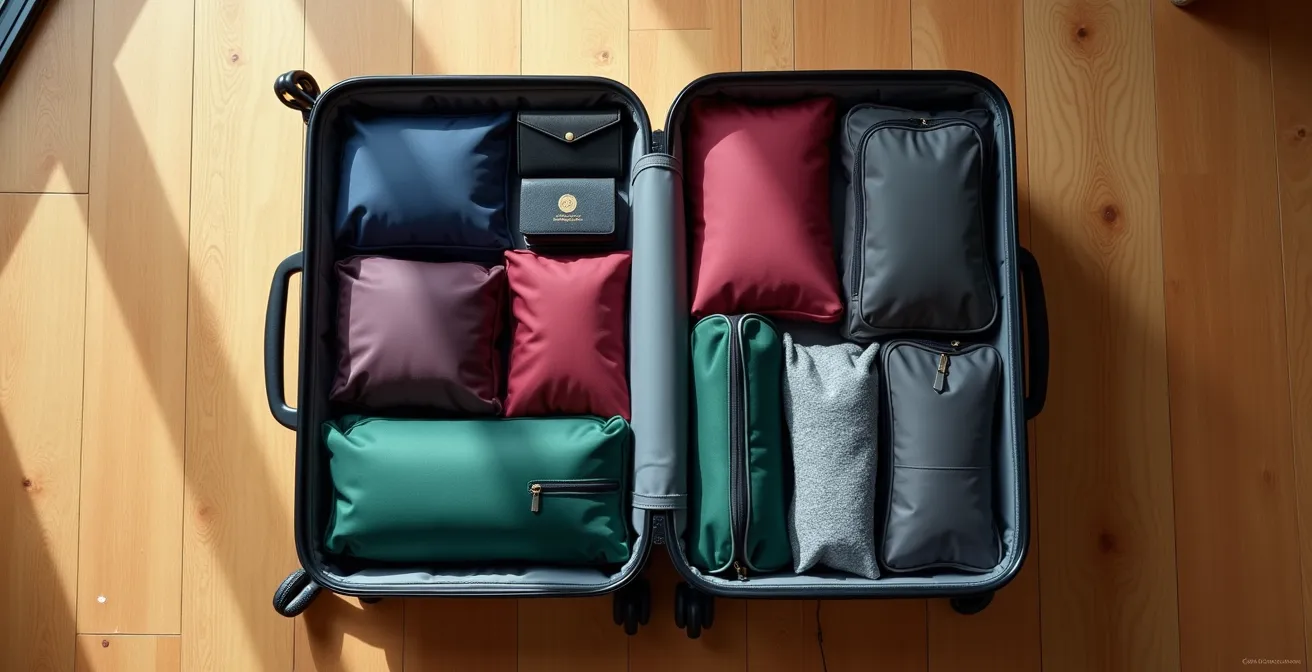
The goal is to travel with a bag that you can comfortably lift, carry up a flight of stairs, or fit onto a crowded train. A lightweight, well-organized suitcase grants you freedom of movement, which is a critical component of feeling safe and in control. It allows you to be nimble, to change plans on the fly, and to navigate new environments without being physically weighed down. The organized system shown above isn’t just aesthetically pleasing; it’s a direct representation of a calm, controlled, and mobile travel style.
How to Survive the First 24 Hours in a Country Where You Don’t Speak the Language?
The first hour after landing in a new country—the “Golden Hour”—is the most critical period for setting the tone of your entire trip. This is when you are at your most vulnerable: jet-lagged, disoriented, and facing a potential language barrier. Having a clear, sequential plan for these first 60 minutes is not about over-scheduling; it’s about creating an “arrival ritual” that systematically eliminates the biggest sources of panic. This is your Golden Hour Protocol.
The protocol is a simple, five-step checklist that you should memorize or have saved on your phone’s lock screen. It prioritizes securing your core needs: communication, money, and safe transport to your accommodation. For instance, your first step should always be to get connected. Having data allows you to use translation apps, which can be a lifeline. Research confirms that travelers who learn basic local phrases are 35% more likely to have positive interactions, but a translation app is the ultimate safety net for complex situations like explaining a dietary restriction or asking for directions to a pharmacy.
Follow this checklist in order. Each completed step builds momentum and a sense of accomplishment, replacing anxiety with a feeling of control. Do not try to multitask. Focus on one step at a time, from landing to arriving safely at your hotel.
- Minute 0-15 (Connectivity): As soon as you deplane, locate an official airport SIM card vendor or activate your pre-purchased eSIM. Do this before you even go through immigration if possible.
- Minute 15-30 (Cash): After clearing customs, find an ATM located inside the airport terminal (preferably one affiliated with a major bank). Withdraw a small amount of local currency for immediate needs like a taxi or snacks.
- Minute 30-45 (Destination): Open your maps app and take a screenshot of your hotel’s address, both in English and in the local script. This is invaluable for showing a taxi driver.
- Minute 45-60 (Transport): Ignore the solicitors in the arrivals hall. Proceed directly to the official, marked taxi stand or use your data to book a verified rideshare, matching the license plate before you get in.
- Post-Arrival (Confirmation): Once you have checked into your hotel and are on their Wi-Fi, send your live location pin and hotel details to a designated emergency contact back home.
Daily Cap or Total Budget: Which Psychological Method Works Best?
Financial anxiety can cast a long shadow over a trip, turning every purchase into a stressful decision. With average fall trip costs rising to $8,056 per trip, managing your money effectively is more critical than ever. The question isn’t just *how much* to budget, but *how* to structure that budget to minimize stress. This is where “Psychological Budgeting” comes in. The two most common methods—a strict daily cap versus a large total pool—have profoundly different mental impacts on a traveler.
A daily cap (e.g., $75 per day) provides structure and reduces decision fatigue. You know exactly what you can spend each day, which is reassuring for anxious first-timers. However, it can feel rigid and may prevent you from enjoying a spontaneous, more expensive experience. On the other hand, a total budget pool (e.g., $1,500 for the whole trip) offers complete freedom. You can splurge one day and be frugal the next. The downside is the risk of “depletion anxiety”—the growing fear that you’ll run out of money before your trip is over, which can cause you to over-compensate by being needlessly cheap in the final days.
For most new travelers, a hybrid “3-Tier Framework” works best. It combines a protected emergency fund, a daily cap for essentials (food, transport), and a separate “experience fund” for splurges. This provides structure while still allowing for flexibility, offering the best psychological protection.
The following table analyzes the mental impact of each approach, helping you choose the one that best suits your personality.
| Method | Daily Psychological Impact | End-Trip Experience | Best For |
|---|---|---|---|
| Daily Cap ($50-100) | Structured, less decision fatigue | Consistent experience throughout | First-timers, anxiety-prone travelers |
| Total Budget Pool | Freedom to splurge or save | Risk of depletion anxiety | Experienced, flexible travelers |
| 3-Tier Framework | Balance of structure and flexibility | Protected emergency fund reduces stress | Most personality types |
Key Takeaways
- Pre-trip anxiety is a normal, predictable response to the unknown; reframing it as a step toward empowerment is the first victory.
- A destination’s “Infrastructure of Safety” (connectivity, transport, payment systems) is a more tangible and reassuring measure of security than generic crime stats.
- The best travel plan for a first-timer is often a “Hybrid Scaffolding” model, which combines the security of pre-booked essentials with the freedom of DIY exploration.
The $50,000 Bill: What Does a Medical Evacuation Actually Cost?
Among all the “what-ifs” that fuel travel anxiety, the fear of a medical emergency abroad is often the most potent. A recent survey reveals that 64% of travelers cite medical issues as a top concern. This fear is not irrational. A simple broken leg or a sudden illness can escalate into a logistical and financial catastrophe if it requires medical evacuation—a private flight with medical staff to bring you home. The price tag for such a service is staggering, often starting at $50,000 and easily exceeding $100,000.
This risk isn’t limited to physical injuries. Mental health crises are a significant and often overlooked component of travel emergencies. According to CDC data on international medical evacuations, psychiatric emergencies account for a substantial portion of repatriations, with depression being a major factor. Alarmingly, 71% of these psychiatric evacuations occurred in travelers in their 20s—the core demographic of first-time adventurers. The cost of a psychiatric evacuation is just as high, requiring specialized personnel and aircraft.
Understanding these costs is not meant to scare you; it’s meant to empower you to create the ultimate financial safety net: comprehensive travel insurance with high limits for medical evacuation. This is the single most important purchase you will make for your trip. The cost of a policy is a tiny fraction of the potential bill, which is composed of multiple high-cost elements:
- Air ambulance mobilization fee: A base cost of $15,000-$25,000 just to get the plane ready.
- Per-mile flight charges: An additional $10-$25 for every mile the medical aircraft flies.
- Medical personnel: A team including a doctor and nurse can cost $5,000-$10,000 per day.
- Ground transport: Ambulance transfers at both the foreign and home airports can add another $2,000-$5,000.
- Foreign hospital costs: Stabilization care before the flight can run from $5,000 to $15,000.
How to Create a Custom Itinerary That actually Works in Practice?
The final piece of your anxiety-proof plan is the itinerary itself. A common mistake is to create a rigid, minute-by-minute schedule packed with activities. This approach leaves no room for discovery and quickly leads to burnout. A much more effective and reassuring method is the “Flexible Block Itinerary.” This system structures your days into broad, themed blocks of time (e.g., “Morning: Museum District,” “Afternoon: Neighborhood Exploration”) rather than specific appointments. It provides a guiding framework without becoming a prison.
This method builds in recovery time and flexibility, which are essential for managing energy and anxiety. For example, scheduling major attractions for morning blocks helps you avoid the largest crowds and the cognitive fatigue they cause. Research even shows that early morning flights show a 30% reduction in anxiety, and a similar principle applies to sightseeing. Starting your day with a clear, achievable goal in a less crowded environment sets a positive tone. By keeping your afternoon and evening blocks intentionally vague, you give yourself permission to rest, to wander, or to dive deeper into something you discovered earlier.
Here is a template for the Flexible Block Itinerary method that you can adapt for any city:
- Day 1 (Arrival/Recovery): Dedicate this day to settling in. Take a low-effort hop-on/hop-off bus tour. Its only purpose is to help you understand the city’s scale and layout without any pressure.
- Days 2-4 (Core Exploration): Use morning blocks (approx. 3 hours) for your “must-see” major attractions. Use shorter afternoon blocks (approx. 2 hours) for secondary sites, with the freedom to extend your time or skip them entirely.
- Evening Blocks: Keep evenings entirely unplanned. This creates space for spontaneous dinner discoveries, resting at your hotel, or simply enjoying the local ambiance.
- Last Day: Leave this day completely unscheduled. It’s a buffer to revisit a favorite spot, catch an attraction you missed, or do some last-minute souvenir shopping without feeling rushed.
You now possess a complete toolkit of systems—not just tips—to transform anxiety into confident anticipation. You have a method for choosing a safe destination, a framework for your budget, a protocol for arrival, and a structure for your daily plans. These are the safety nets that will catch you, giving you the freedom to truly experience the world on your own terms. Your first overseas trip is not a test to be passed, but an adventure to be lived. Start building your plan today, and get ready for the empowering journey that awaits.